

To understand why hand placement is so important, it helps to know a little about what’s happening inside the chest. The heart sits protected behind the rib cage and the breastbone, also known as the sternum. The entire goal of chest compressions is to manually squeeze the heart between the sternum and the spine, forcing blood to circulate to the brain and other vital organs. If your hands are too high, too low, or off to the side, you lose that direct pressure. This is why the correct cpr hand placement sternum is not just a suggestion—it’s the foundation of effective CPR, ensuring your energy creates life-sustaining blood flow.
Proper hand placement is key for effective CPR chest compressions. It determines the success of life-saving efforts. The correct hand position is key. It maximizes each compression’s effectiveness. It boosts blood flow and survival odds in emergencies.
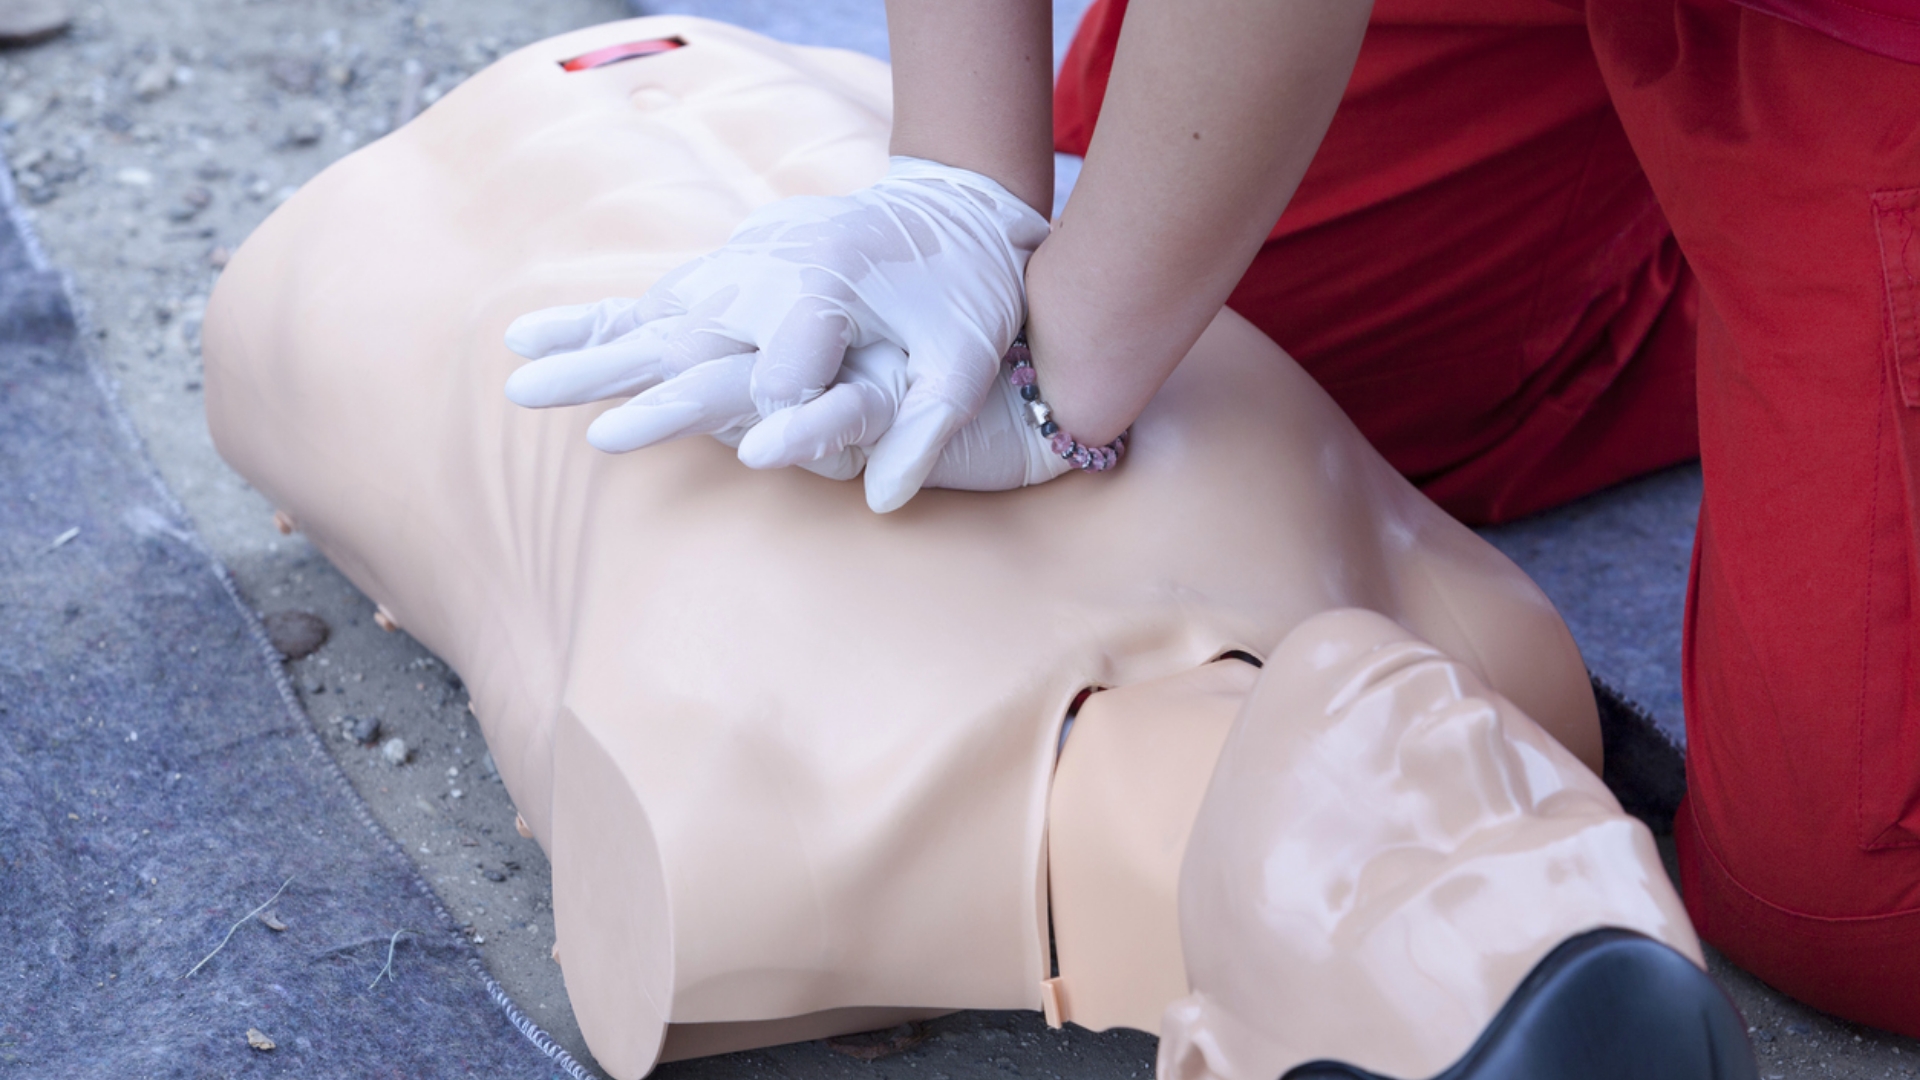
- Place both hands at the center of the chest when performing CPR on adults. Proper hand positioning is crucial to ensure the effectiveness of compressions.
- When doing CPR on children, place one or two hands at the center of the chest, depending on the child’s size. This ensures proper compressions.
- For infants, use two fingers at the chest center for CPR compressions. Apply gentle but effective pressure.
What Exactly Is CPR Hand Placement?
Correct hand placement during CPR is crucial for effective resuscitation. Position hands at the center of the chest. It ensures a good compression depth and rate. Both are vital for success. Poor hand placement can lead to weak compressions and rib fractures. For effective hand placement in CPR, responders must seek guidance from medical professionals. They practice with mannequins or training devices, gaining hands-on familiarity daily. This ensures accurate technique and optimal performance during actual resuscitation efforts.
How to Position Your Hands for Adult CPR
Correct hand placement is essential for performing effective chest compressions during CPR. For adults, position your hands in the center of the chest, aligned between the nipples. This placement helps maximize the impact of each compression. It improves CPR effectiveness.
- Place the heel of one hand in the center of the chest.
- Position the heel of your other hand atop, weaving your fingers together.
- Align your shoulders with your hands.
- Keep your arms straight. Push down at least 2 inches at a rate of 100 to 120 compressions per minute.
- Allow the chest to fill with air, then compress.
- Avoid lifting your hands completely off the chest.
Administer chest compressions. Drive it through with unrelenting determination. Stop when life signs appear or responders take over. If necessary, provide rescue breaths with minimal breaks in compressions. Continue this process until normal breathing resumes or help arrives.
Finding the Exact Spot on the Chest
While “the center of the chest” is the general rule, being more precise can make a huge difference. The goal is to compress the heart between the breastbone (sternum) and the spine to circulate blood. Finding the exact spot ensures you apply pressure effectively and safely, avoiding the delicate tip of the breastbone or the upper abdomen. Taking a moment to find this landmark helps you deliver powerful, life-saving compressions right where they’re needed most. This is a fundamental skill we emphasize in our hands-on training sessions, as it builds the muscle memory needed to act confidently in a real emergency.
Step 1: Locate the Breastbone
To find the correct position, start by locating the person’s breastbone. According to My Health Alberta, you should “use your fingers to feel where the person’s ribs meet at the bottom of their breastbone.” This creates a small, V-shaped notch. This spot, known as the xiphoid process, is a critical landmark. Placing your hands directly on it can cause internal injury, so identifying it first is a key step in ensuring you position your hands just above it, on the stronger, flatter part of the sternum. This provides a solid foundation for effective compressions.
Step 2: Place Your Hand
Once you’ve found the bottom tip of the breastbone, you can accurately position your hand. Columbia Doctors advises to “put two fingers right at the very tip of the breastbone. Place the heel of your other hand just above those two fingers (closer to the person’s head).” This simple measurement places the heel of your hand squarely on the lower half of the sternum, directly over the heart. This is the sweet spot where your compressions will be most effective at pumping blood throughout the body, maximizing the chances of a positive outcome.
Proper Body and Hand Posture
Your body posture is just as important as your hand placement. Effective CPR relies on using your body weight, not just your arm strength. Proper form allows you to deliver deep, consistent compressions without tiring out too quickly. By positioning your body directly over the person and keeping your arms straight, you create a powerful piston-like motion that drives blood flow efficiently. Mastering this posture is a core component of any CPR certification course, as it transforms your efforts from tiring pushes into sustainable, life-saving compressions that can be maintained until help arrives.
Interlocking Your Fingers
After placing the heel of one hand on the chest, place your other hand on top and interlock your fingers. The key here is to “lift [your fingers] so they don’t touch the person’s chest,” as recommended by My Health Alberta. This technique serves a critical purpose: it concentrates all the force directly through the heels of your hands. This focus ensures the pressure is applied to the sternum and not distributed across the ribs, which helps prevent fractures and makes each compression more effective. It’s a small detail that contributes to safer and more powerful CPR.
Keeping Your Arms Straight
To generate enough force for deep compressions, your body alignment is everything. MedlinePlus instructs rescuers to “make sure your body is directly over your hands. Keep your arms straight and lock your elbows.” This posture allows you to pivot from your hips and use your upper body weight to push down, rather than relying on your arm muscles. Bending your elbows is a common mistake that leads to rapid fatigue and shallow compressions. By keeping your arms straight, you can deliver consistent, high-quality compressions for a longer period.
Allowing for Full Chest Recoil
The push is only half the job. Allowing the chest to return to its normal position after each compression is just as critical. This is called chest recoil. As MedlinePlus explains, “After each push, let the chest come all the way back up before pushing again.” This recoil phase is when the heart refills with blood. If you lean on the chest and don’t allow it to rise completely, the heart can’t fill properly, and your next compression will pump very little blood. Maintaining a steady rhythm of pushing down and coming all the way up ensures that every compression is moving a meaningful amount of oxygenated blood to the brain and other vital organs.
Where to Place Your Hands for Child CPR
When performing CPR on a child, position one or two hands in the center of the chest between the nipples. If you feel tired, use both hands. This will help you keep the right compression depth. Aim for 100 to 120 compressions per minute.
How to Position Your Hands for Infant CPR
For infants under one year, use two fingers for chest compressions. Place them below the nipple line. An infant’s chest is small. So, use two fingers for compressions. Compress to a depth of about 1.5 inches, or one-third of the chest depth. Do at least 100 compressions per minute. The American Heart Association says rescue breathing is vital for infants and young kids. So, give 30 chest compressions, then 2 breaths. Repeat this until normal breathing returns or emergency professionals arrive.
If you’re in Illinois and look after infants or young kids, you must learn CPR techniques that suit their age. In Maryland, local training centers have specialized pediatric CPR courses. They focus on hand placement, compression depth, and rescue breathing for infants. These programs help you respond quickly and confidently during emergencies. You’ll learn to assist young or vulnerable patients.
Alternative: The Two-Thumb Method
While the two-finger technique is common, there’s another highly effective option for infant CPR: the two-thumb, hands-encircling-the-chest method. Many rescuers find this technique allows for more consistent and forceful compressions, especially if you need to perform CPR for an extended period. To do it, wrap both of your hands around the infant’s torso, supporting their back with your fingers. Place both thumbs side-by-side on the center of the chest, just below the nipple line. Use your thumbs to press down about 1.5 inches, maintaining a rate of 100 to 120 compressions per minute. After 30 compressions, deliver two gentle rescue breaths. Mastering techniques like this is a core part of any good CPR training course and is essential for building the confidence to act correctly in an emergency.
Why High-Quality CPR Starts With Your Hands
Chest compressions are crucial in CPR. They pump the heart by hand and circulate oxygen-rich blood to crucial organs when it fails. This action is vital. It keeps blood flowing to the brain and other key areas during cardiac arrest. Inadequate compressions hinder effective blood circulation, rendering CPR ineffective. Proper chest compressions are vital until help arrives. They can also help the heart resume its normal rhythm.
The Critical Role of an AED
While high-quality chest compressions are the foundation of saving a life, there’s another tool that dramatically increases the chances of survival: the Automated External Defibrillator, or AED. Think of CPR and an AED as a team. CPR manually keeps oxygen-rich blood flowing to the brain and vital organs, acting as a bridge to life. The AED, on the other hand, is a sophisticated but easy-to-use medical device that can correct the underlying electrical problem in the heart that causes sudden cardiac arrest. Having both the skills to perform CPR and an AED nearby is the key to a successful outcome.
An AED is a portable device that analyzes the heart’s rhythm and, if necessary, delivers an electrical shock (defibrillation) to help the heart re-establish an effective rhythm. Sudden cardiac arrest is not the same as a heart attack; it’s an electrical malfunction that causes the heart to stop beating unexpectedly. Without immediate intervention, it is almost always fatal. That’s why public access to AEDs in places like offices, schools, and gyms is so important. Combining your knowledge of hand placement with the power of an AED makes you a truly effective first responder in an emergency.
Why CPR Alone Isn’t Always Enough
CPR is an essential, life-sustaining action. By performing chest compressions, you are essentially doing the heart’s job for it, pushing blood throughout the body to prevent brain damage and organ failure. However, CPR alone often can’t fix the root cause of sudden cardiac arrest. In many cases, the heart has entered a chaotic and ineffective rhythm called ventricular fibrillation. While your compressions keep the person alive moment to moment, they can’t reset this dangerous electrical state. That’s where the AED becomes absolutely critical for survival.
An AED is the only treatment that can correct this electrical malfunction. It delivers a controlled shock that momentarily stops the heart, giving it a chance to reset and resume a normal, healthy rhythm. According to the American Red Cross, CPR can maintain blood flow, but the AED is what addresses the abnormal heart rhythm itself. Without an AED, the heroic efforts of CPR may only delay the inevitable. The two interventions work hand-in-hand to give a person the best possible chance of walking away from a cardiac emergency.
How an AED Increases Survival Rates
When someone experiences sudden cardiac arrest, every second counts. The American Heart Association reports that immediate CPR and the use of an AED can double, or even triple, a person’s chance of survival. This staggering statistic highlights why having an AED accessible is just as important as knowing how to perform CPR. The device is designed to be intelligent; its first step is to analyze the person’s heart rhythm to determine if a shock is actually needed. It will not deliver a shock unless it detects a life-threatening arrhythmia, making it incredibly safe to use.
This automated analysis removes the guesswork and pressure from the rescuer. You don’t need to be a doctor to use an AED—you just need to be willing to act. By having these devices available in public spaces and workplaces, we create a safety net that empowers bystanders to become immediate lifesavers. Ensuring your organization has a complete emergency plan, including accessible AED devices and trained responders, is a critical step in protecting your people and being truly prepared for an emergency.
User-Friendly Design for Untrained Responders
If the idea of using a medical device to deliver an electrical shock sounds intimidating, you can breathe a sigh of relief. AEDs are specifically designed to be used by anyone, regardless of their level of training. Once you open the device, it immediately begins giving clear, calm voice instructions to guide you through every step. The pads have simple diagrams showing you exactly where to place them on the person’s chest. The machine handles the complex part—analyzing the heart rhythm—and tells you precisely when to push the button to deliver a shock, if one is needed.
This user-friendly design is intentional. It empowers ordinary people to step in and make a life-or-death difference. While you can use an AED without prior instruction, taking a hands-on CPR and AED course builds the confidence you need to act quickly and decisively under pressure. Familiarity with the device in a low-stress training environment ensures you won’t hesitate when a real emergency happens, making you an invaluable asset to your community, family, or workplace.
Finding the CPR Hand Placement Sweet Spot on the Sternum
For effective CPR, place your hands on the lower half of the breastbone, at the center of the chest. This will ensure proper chest compressions. Stack one hand on top of the other, with the heel of the top hand resting on the bottom hand. This positioning allows for optimal depth and force in each compression. This technique is key. It improves survival by delivering effective compressions. A recent study on chest compressions measured the distance in young adults from the suprasternal notch, at the throat’s base, to the bottom of the breastbone. Also, researchers measured the width of the heel of the hand at two points. This was to find the best hand placement for effective compressions. Researchers studied 300 men and 300 women. They found that, for chest compressions, the best hand placement varies by height and gender. When on the patient’s left side, use your right little finger to find the suprasternal notch. Then, place the heel of your left hand one hand-width away. If you’re on the patient’s right side, use your left little finger to find the notch. Then, place the heel of your right hand one hand-width away. This method ensures the most effective chest compressions.
CPR Hand Placement: Adult vs. Child vs. Infant
For adults, place your hands on the lower half of the breastbone at the center of the chest for CPR. Place one hand atop the other, heel to palm. For children, use one hand, centered on the chest. For older or larger kids, you may need two hands. In infants, use two fingers for chest compressions. Focus on the center of the chest. Avoid using the whole hand. Proper hand placement is crucial for all ages. It ensures effective chest compressions and improves survival chances.
Does hand placement impact the effectiveness of chest compressions?
Hand placement during CPR is crucial for the effectiveness of chest compressions. Proper positioning improves compressions and boosts the chances of restoring blood flow.
- Effective Compression Depth: Correct hand placement ensures the right compression depth during CPR. Adults should press down on the sternum approximately 2 to 2.4 inches (5 to 6 centimeters). Poor hand positioning can reduce compression depth. This, in turn, lowers blood circulation.
- Avoiding Rib Fractures: In CPR, correct hand placement for adults helps prevent rib fractures. Positioning the hands on the sternum instead of the ribs. It distributes the compression force uniformly across the surface. This lowers the chance of rib injuries.
- CPR must distribute force optimally. Proper hand placement sends it to the heart and major blood vessels. This boosts blood flow and oxygen delivery to vital organs.
- Minimizing Interruptions: Precise hand placement during CPR ensures consistent and uninterrupted chest compressions. Poor positioning can lead to constant adjustments. This can reduce the effectiveness of resuscitation efforts.
Circulation Enhancement: Proper CPR hand placement is crucial. It pumps blood to the heart and brain during cardiac arrest. Poor positioning can block blood flow and reduce oxygen delivery. This can hinder resuscitation efforts.
The Sternum: Your Target for CPR Hand Placement
The sternum, or breastbone, is a key flat bone in the chest. It protects vital organs, like the heart and lungs. For effective CPR, placing your hands on the lower half of the sternum is essential. This position places compressions at the heart’s center. This enhances blood flow and circulation. Correct hand placement in CPR is vital. It minimizes the risk of rib fractures and injuries. It also maximizes resuscitation efforts. Positioning hands centrally above the breastbone maximizes cardiac blood flow. It also improves the chances of a successful outcome and a positive recovery for the person in need.
One Hand or Two? How Many to Use for CPR
Use one or two hands for CPR, depending on the situation. Two hands provide more pressure, so they are ideal for adults and children over eight. Adult bones are sturdier. They can withstand deeper compressions with both hands. This is crucial for effective CPR. For children aged 1 to 8, it is best to use one hand when performing CPR. Infants should only use two or three fingers because they are fragile. Too much pressure on an infant can cause broken bones or internal injuries. So, gentle compressions are crucial.
What is Hands-Only CPR?
Hands-only CPR uses chest compressions only, with no rescue breaths. Place your hands the same as in traditional CPR. The purpose is to keep blood circulating until professional medical help arrives. Studies show that hands-only CPR works as well as conventional CPR. It maintains circulation and supports the victim until advanced care arrives.
What Happens When CPR Hand Placement Is Wrong?
Wrong hand placement in CPR can cause complications. It can reduce the effectiveness of compressions and hurt resuscitation efforts.
- Incorrect hand placement in CPR can fail to compress the heart and major blood vessels. It can reduce blood flow and oxygen to vital organs. This worsens the patient’s condition.
- Placing hands too high or too low on the chest can lead to shallow compressions. They won’t generate the pressure needed to move blood. This will reduce the effectiveness of CPR.
- Placing hands on the ribs, not the sternum, during CPR raises the risk of rib fractures and injuries. Proper sternum alignment channels force downward, minimizing cardiac compromise.
- Improper hand placement during CPR can cause uneven compressions. This disrupts blood flow and lowers the chances of successful resuscitation.
- Poor hand positioning and shallow CPR compressions can cause organ damage. Inadequate compressions fail to maintain blood circulation.
- Correcting hand placement during CPR can waste time. It can delay calling for help, which is vital for survival.
- Incorrect hand placement in CPR can prevent full chest recoil between compressions. This is vital for the heart to refill with blood before the next compression. Proper recoil is crucial for maintaining effective blood flow.
- Incorrect hand placement in CPR can cause fatigue. This leads to poorer chest compression quality over time.
Proper CPR training is vital. It reduces the risks of incorrect hand placement, compression depth, and rate. In an emergency, do your best with chest compressions. Seek help, too. Doing something is better than doing nothing.
Real-World Challenges of CPR
Knowing the correct hand placement for CPR is one thing, but applying it during a real emergency is a completely different challenge. The stress of the moment, the environment, and the physical exertion can make even the most well-rehearsed steps feel foreign. In a controlled classroom setting, you have an instructor guiding you and a mannequin that doesn’t fight back. In reality, you’re dealing with a chaotic situation where every second counts. Understanding these real-world hurdles is the first step toward preparing yourself to act effectively and confidently when someone’s life is on the line. It’s not just about memorizing the technique; it’s about building the resilience to perform under pressure.
Most Cardiac Arrests Happen at Home
One of the most sobering statistics about cardiac arrest is that it most often happens at home. This means the person you’re most likely to perform CPR on is not a stranger in a public place, but a partner, a parent, a child, or a close friend. While we often imagine heroes saving people in dramatic public scenarios, the reality is far more personal and immediate. This fact underscores why CPR training isn’t just a skill for medical professionals or designated first responders; it’s a fundamental life skill for everyone. Being prepared to act in your own home can make the difference between life and death for the people you care about most, turning a moment of crisis into a story of survival.
Overcoming Hesitation and Building Confidence
Even people who have completed CPR training can freeze in a real emergency. The fear of doing something wrong, causing harm, or forgetting a step can lead to a dangerous hesitation. This is completely normal, but it’s a barrier that effective training is designed to break down. The key is moving the knowledge from your head to your hands through muscle memory. This is why hands-on, instructor-led safety training is so critical. By practicing on mannequins in realistic scenarios, you build the confidence to trust your skills when adrenaline is high. The goal is to make the response so automatic that you can act decisively without overthinking.
The Physical Demands of Chest Compressions
Performing high-quality chest compressions is physically demanding, far more so than most people realize until they have to do it. Pushing down two inches on an adult’s chest 100 to 120 times per minute requires significant strength and stamina. Fatigue can set in quickly, causing the quality of your compressions to decline. This is why proper body mechanics—keeping your arms straight and using your body weight—are so important. It’s also why having an Automated External Defibrillator (AED) nearby is a game-changer. An AED not only provides life-saving shocks but also offers audio prompts that guide your compression rate, helping you maintain a steady rhythm until professional help arrives.
Getting Trained: How to Learn Correct Hand Placement
Both healthcare providers and laypersons can learn proper CPR hand placement by taking certified CPR classes. These courses teach the correct techniques for chest compressions. They include the proper hand positions for adults, children, and infants. Practicing CPR on a mannequin or training device helps refine skills. It ensures effective chest compressions with proper hand placement.
Emergency preparedness goes beyond CPR. Knowing how to respond to fires is key. It helps save lives and protect property. A Fire Extinguisher Live Fire training course lets you practice with real extinguishers. You’ll work in safe, controlled settings. It shows participants how to test fire situations. They learn to pick the right extinguisher and respond with confidence on time. This is like how CPR training prepares people for medical emergencies.
How Deep and How Fast? Nailing CPR Compressions
It’s crucial to get the right depth and rate of chest compressions when doing CPR. It ensures that CPR will be effective.
- For adults, chest compressions should be 2 to 2.4 inches deep. They should be at a rate of 100 to 120 per minute.
- For children, chest compressions must be at least 2 inches deep. Do them at a rate of 100 to 120 per minute.
- For infants, compressions must be at least 1.5 inches deep. Do them at a rate of 100 to 120 per minute.
An infant CPR certification course is useful. It teaches the specific techniques for performing CPR on infants.
Understanding Compression Cycles
Effective CPR isn’t just about pushing on the chest; it’s about performing compressions in a consistent, rhythmic cycle. Think of chest compressions as a way to manually pump the heart, forcing blood to circulate to the brain and other vital organs when the heart has stopped. A compression cycle is a set number of compressions followed by a set number of rescue breaths. This pattern is repeated over and over to maintain blood circulation and provide oxygen. Interrupting this cycle can cause blood pressure to drop, reducing the effectiveness of your efforts. That’s why maintaining a steady rhythm of high-quality compressions is one of the most critical parts of saving a life.
The 30:2 Ratio for Adults and Children
For most situations involving adults and children, the magic number to remember is 30:2. This is the universally recommended ratio of chest compressions to rescue breaths. You’ll perform 30 hard and fast chest compressions, then pause briefly to give two rescue breaths. This sequence is designed to strike a crucial balance: the compressions keep oxygenated blood moving, while the breaths replenish the oxygen supply. You should continue repeating this 30:2 cycle without stopping until you see obvious signs of life, an AED is ready to use, or another trained responder or emergency medical services professional can take over for you.
Adapting Hand Placement for Special Situations
CPR hand placement techniques must adapt for patients with rare conditions. This ensures both safety and effective chest compressions. Prioritizing proper technique is crucial for the individual’s well-being.
Adjusting for a Larger Body Type
People with obesity or a larger build position their hands higher on their chest. This will help you compress to the right depth. If needed, apply more force to reach the recommended depth. But be careful not to cause injury.
Hand Placement During Pregnancy
For pregnant individuals, place your hands higher on the sternum. This avoids pressure on the abdomen and fetus. Apply gentle, controlled compressions to protect both the mother and the unborn child.
Hand Placement for Older Adults
Handle with care when applying compressions to older adults, whose ribs are fragile. Proper hand placement is essential to reduce the risk of rib fractures.
For Individuals with Fragile Bones
Position hands accurately to cut osteoporosis patients’ fracture risks. Using shorter compressions reduces pressure and prevents injury.
Adapting to Chest Deformities
Adapt hand placement according to the chest deformity, avoiding pressure on protruding areas. Ensure you focus compressions on the sternum to sustain effective blood circulation.
CPR with Implanted Devices like Pacemakers
When doing CPR on a patient with an implanted device, like a pacemaker or defibrillator, position your hands above it to avoid damage. It’s important to follow any specific guidelines from healthcare professionals. They will ensure that the device is not harmed during resuscitation.
CPR for Drowning: Does Hand Placement Change?
In drowning cases, CPR hand placement is the same as for other adult cardiac emergencies. Place your hands on the center of the chest, above the sternum. This will ensure effective compressions and maximize the chances of resuscitation.
- Place one hand’s heel at the chest’s center, under the nipple.
- Place the second hand on top of the first and interlock the fingers. This positioning enables direct sternum compressions, optimizing heart compression and circulation.
- Deliver chest compressions with a firm, rapid force. Aim for 100-120 compressions per minute. Make each compression at least 2 inches deep for adults, especially in drowning cases.
Effective CPR administration increases drowning survival rates significantly.
Using Feedback Devices to Perfect Your CPR
Feedback technology is crucial for refining CPR. It gives real-time insights into the effectiveness of compressions. Devices with pressure sensors or accelerometers check compression depth and rate. They provide instant feedback on their quality. It enables healthcare providers and responders to identify and correct technique flaws. It ensures they provide the best care to patients.
Common Hand Placement Mistakes to Avoid
Misplacing hands during CPR often results in ineffective compressions. Common errors include placing hands too high or too low on the sternum. This reduces compression depth and blood flow to vital organs. Also, if hands are not centered on the chest, compressions may miss the heart. It reduces the possibility of resuscitation success. Wrong hand placement in CPR can cause injuries, like rib fractures. This complicates the emergency. Align hands precisely to achieve effective cardiac resuscitation. Place them over the lower half of the sternum. Follow established guidelines and training protocols.
Hand Placement vs. Compression Depth: Which Is More Critical in CPR?
Both hand placement and compression depth are essential for effective cardiopulmonary resuscitation (CPR). Proper hand placement ensures that compressions are over the sternum. This optimizes the pressure on the heart. This correct positioning improves compressions. It boosts blood flow and raises the odds of a successful resuscitation. Compression depth is another key aspect of CPR. It describes the extent of chest compression. For adults, compressions must be at least 2 inches (5 cm) deep. This is to generate enough blood flow to vital organs. Precise compression delivers blood from the heart to the brain. It maximizes success.
Are CPR Hand Placement Rules the Same Everywhere?
CPR guidelines, including hand placement, are generally standardized worldwide. Key organizations like the AHA, ERC, and ILCOR collaborate. They establish trustworthy methods, adopted throughout diverse geographical areas. This approach ensures that CPR techniques, including hand positioning, are effective and consistent everywhere. The core technique for hand placement in CPR is consistent. Terms and emphasis differ in subtle ways. Position one hand’s heel at the center of the chest, below the nipple line. Place the other hand on top, with fingers interlocked. This approach guarantees effective compression over the sternum, promoting optimal blood circulation.
Teamwork: Ensuring Consistent Hand Placement
In emergencies, healthcare providers and responders must coordinate. They must use the same hand placement during CPR. This involves adhering to standardized procedures and consulting with medical professionals when needed. Regular practice with mannequins or training devices helps. It ensures that everyone has the correct hand placement and technique skills. Healthcare providers need to guide responders on hand placement and technique. They should also provide feedback on their performance. This approach ensures that providers and responders deliver high-quality chest compressions, with correct hand placement, in emergencies. How Proper CPR Hand Placement Enhances Compression Quality in Training Effective CPR training stresses the importance of correct hand placement. It affects the quality of chest compressions and the success of resuscitation. Proper hand placement ensures compressions reach 2 to 2.4 inches deep. This is key for blood flow and to reduce injury. Center chest alignment amplifies gravity’s pull, enhancing the downward push. This makes compressions more efficient and reduces injury risk. Virtual CPR training and certification stress proper hand placement in chest compressions. This online course teaches you the techniques for perfect compression depth and alignment. Virtual training improves your emergency response skills. It boosts your chances of saving lives.
Faq
A Quick Recap: Positioning Your Hands for CPR
For effective CPR, hand placement is crucial. For adults, place the heel of one hand on the center of the chest, below the nipple line. Then, place the other hand on top, interlocking the fingers. For infants, use two fingers to compress the center of the chest below the nipple line. Align your hands or fingers to avoid slipping. This will ensure effective compressions.
Finding the Center of the Chest
Proper hand placement in CPR is vital. It maximizes the effectiveness of chest compressions. Adults should position their hands in the center of the chest, below the nipple line. For children, use one or two hands depending on the size of the child, placing them on the lower half of the sternum. For infants, use two fingers to compress below the nipple line. Proper hand placement directs compressions toward the heart. It helps maintain blood circulation.
Infant CPR: The Two-Finger Rule
When performing CPR on an infant, place two fingers in the center of the chest, below the nipple line. The compressions should be 1.5 inches deep. Deliver them at 100-120 per minute. Place fingers precisely where they belong on the instrument. This avoids injury and keeps blood flow.
Key Takeaways
- Find the Sweet Spot for Maximum Impact: For adults, correct hand placement is on the lower half of the breastbone, not just the center of the chest. This specific location ensures your energy directly compresses the heart, making every push count.
- Adapt Your Technique to the Person’s Size: One method doesn’t fit all. Use two interlocked hands for an adult, one or two hands for a child, and two fingers for an infant to deliver compressions that are both safe and effective for their body.
- Let Your Body Weight Do the Work: Powerful CPR comes from proper posture, not just arm strength. By keeping your arms straight and positioning your shoulders over your hands, you can deliver deep, consistent compressions without tiring out quickly.
Related Articles
Disclaimer for information purposes only:
The information provided on this website is intended for general educational and informational purposes only. It is not medical advice and should not be used as a substitute for professional diagnosis, treatment, or care. Always consult a qualified healthcare or medical professional regarding any health-related questions or concerns.
While we strive to ensure the information shared is accurate and up to date, no guarantees are made regarding completeness, accuracy, or applicability to any individual situation. Use of this content is at the reader’s sole discretion and risk.
This website is part of the Response Ready family of emergency preparedness and training resources, including CPR & first aid training and compliance services, AED sales and program support, AED program management software, and medical oversight solutions provided through our affiliated platforms:
• AEDLeader.com
• ResponseReady.com
• AEDTotalSolution.com
• MDSIMedical.com
By accessing or using this website, you agree to release, indemnify, and hold harmless the website owners, authors, contributors, and affiliated entities from any claims, losses, damages, or liabilities arising from the use or reliance on the information presented.

Anastasios Giannikas
Anastasios Giannikas
Save Lives with the Right AED Today
Buy Trusted AEDs from AED Leader Today!
Get Certified in CPR and Make a Difference!


